The different ways you can add templates
A template is a piece of content (text and pictures and other media) that you can place into other articles. Common examples of where you might use a template are a disclaimer paragraph that you add to the bottom of each article, or a series of steps that are common to many of your instructions.
You can add, replace or include templates in articles.
- Insert pastes the content of the template into the article. Once the content is added you edit it like any other article content.
- Replace works the same way except that instead of just placing the template content into the article at your cursor position, it replaces everything in the article.
- Include is different in that it just puts a marker in the article, it doesn't put the contents in. The template content is pulled in when the reader opens the article to view it. When you edit the article you don't see the content from the template, all you see is a code like or [tmpl:includeisclaimer] and you can't edit the contents of the template in the article, you have to go back to the template to do it.
The great thing about include is that if you can update the template as many times as you like and the changes always flow through to the article. This is not like add and replace, which place the contents of the template into the article, so once it's there it doesn't change if you update the template.
To add a template to an article
Your template must exist before you can use it in an article.
To add a template to an article:
- Add or update the article.
- If you are going to add or link to a template, place the cursor where you want to include the template.
- Choose the template from the Template drop-down menu.
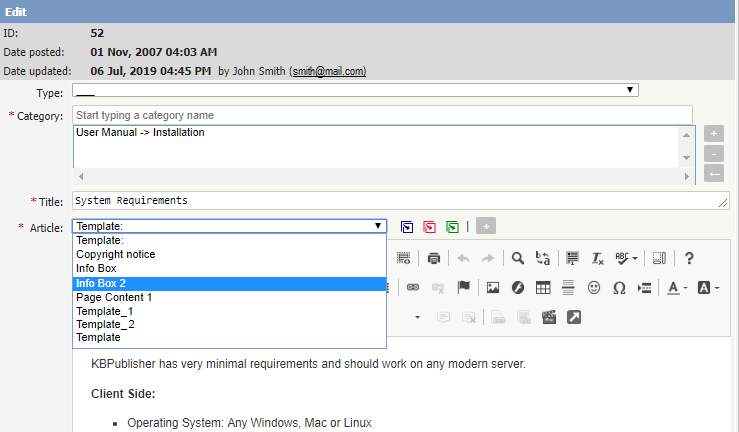
- Click on the appropriate insert template icon
- If you wish to add the contents of the template to the article, click on the icon with the blue arrow. This pastes the text of the template where the cursor is currently positioned. It does not affect any of the text above or below it.
- If you wish to replace the contents of the article, click on the icon with the red arrow. This deletes any text currently in the article and replaces it with the text in the template.
- If you wish to include the contents of the template, click on the icon with the green arrow. This puts a placeholder into the article and when a user opens the article to read it, the knowledgebase pulls in the text from the placeholder template.
- If you have defined a key for your template, you can also include the template by typing in the special template include command and the template key into the editor window. i.e. By typing [tmpl:include|<template_key>] where <template_key> is the template key
- Or you can use the template ID in the template include command, i.e. [tmpl:include|<ID>] where <ID> is the template ID.
Alternatively, you can use the Template icon in the editing toolbar, but this only allows you to add or replace the template; it does not allow you to link the contents.
If you choose this option:
- Add or update the article
- Place your cursor where you want to insert the template
- Click on the templates icon (check out the edit toolbar explained to see where the templates icon is on the toolbar)
- This opens a pop-up box. If you intend to replace the current contents, check Replace actual contents
- Click on the name of the template
- This returns you to the editor with the template inserted.
Tip:

