The public area in KBPublisher is what people who are reading the articles or looking at the files see (as opposed to the admin area, which is what authors, editors, moderators and administrators see).
Whether or not a user has to log in to view the public view depends entirely on how you have set up your knowledgebase. It can be set up in any of the following ways:
- Everyone who accesses your site can read the knowledgebase
- Anyone who wants to read the knowledgebase must register and login
- Part of the knowledgebase is available to anyone who visits your site while you must log on to view other parts.
Below is a screenshot of the public view.
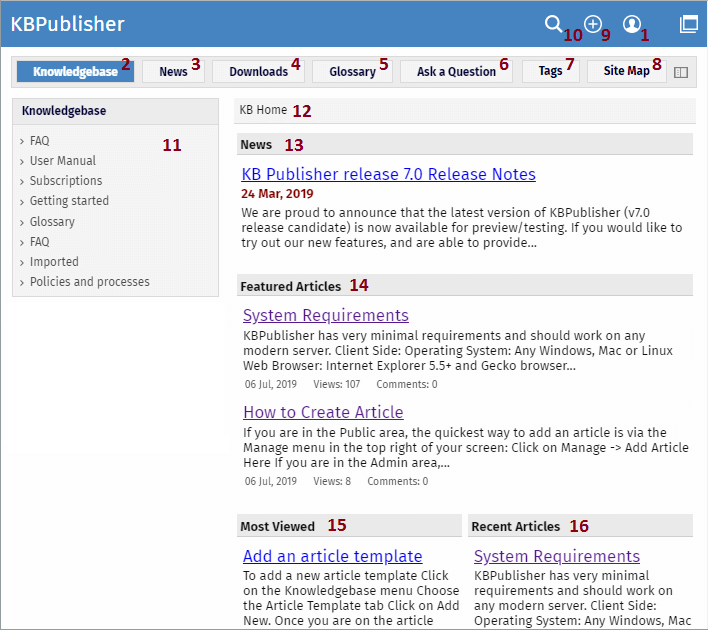
Login details are in the top right-hand corner
- If you are a registered user you can login. Once you are logged in this section shows who you are logged in as, and the option changes to logout. If your login has author, contributor, editor or administrator privileges, this will also include a link to the admin view.
If you knowledgebase administrator allows it, you can also register as a user to get access to non-public areas of the knowledgebase.
This area also contains My Account, which is where you can change your password and user name, manage subscriptions and personalize some settings.
Menu options (table of contents) can on the left-hand side, on the top menu or above the listed articles, depending on how the knowledgebase is set up. In this case, it has been set up so that menu options are in tabs across the top of the page.
- When you first enter the screen the Knowledgebase tab is highlighted, meaning that articles are displayed. Articles are content that people have authored directly to the knowledgebase.
- Click on News to see a full list of news items.
- Click on Downloads to display a list of files instead. These files have been uploaded and may be text (e.g. Word documents, PDF files), graphics or other file.
- Click on Glossary to display items in the glossary. While you are reading articles you will come across red words. These words have been defined in the glossary.
- Ask a question allows the reader to contact the knowledgebase administrators. You might do this if, say, you couldn't find the information you were looking for, had problems using the system, or even if you had an idea for an article.
- Tags are keywords and phrases which help readers easily find articles related to specific topics.
- Site Map allows visitors to get the whole map of your knowledgebase and quickly find required section.
Add article
- If you have contributor or author access, you will also have an icon. When clicking, a menu of commands opens to allow you to quickly add articles, news, files, etc.
Search
- The knowledgebase has both quick search and advanced search. Type text or an article ID into the search field for a quick search, or you can search on other options using the advanced search.
Categories
- The Categories section is the table of contents. The user clicks on category items to see sub-categories. Articles in each category are displayed in the main part of the screen.
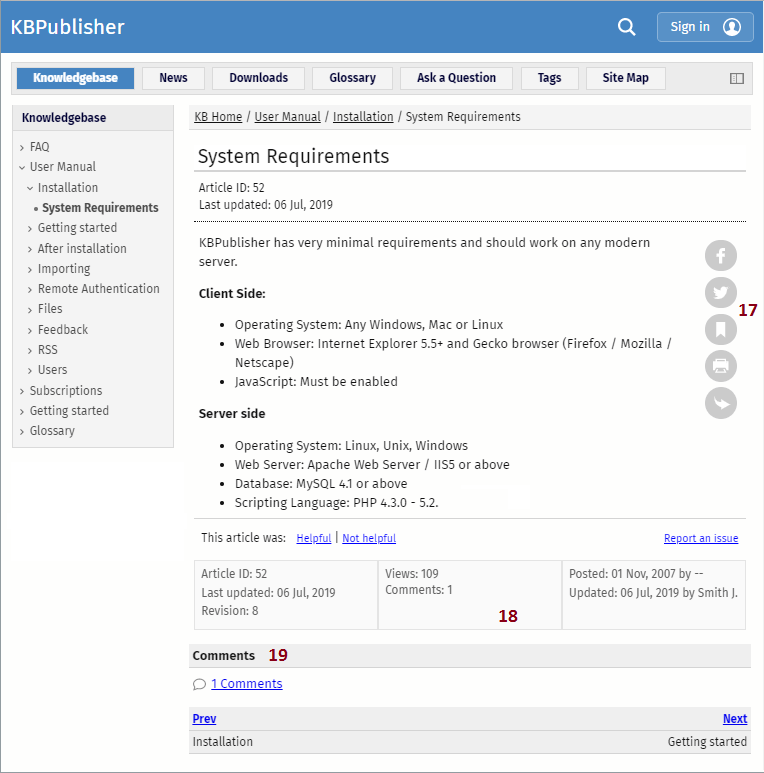
Breadcrumb trail
- The breadcrumb trail at the top of the screen shows you where in the article or file hierarchy. You can click on this links to move back to a higher level.
The actual content is in the main screen
- News is displayed at the top of the screen.
- Categories may also be displayed on the main screen. They can be on the left menu, on the main screen or on both.
- When you first enter Public area, or click on Knowledgebase or Downloads, the main screen contains two columns. The first column lists the five articles or files that have been viewed most often.
- The second column lists the last five articles or columns added. You can click on any of the articles to open the article to read it.
When you click on an actual article the article is displayed in the main screen, and the article that you are viewing is highlighted in the left menu.
- The floating action block displays options you can do to this article. As a viewer you can share the article through socials, email it to a friend, print the article, export in PDF, add a comment, add to Favorites. Print brings up a clean copy of the text without associated headings and menus which you can then print using your print button. Email to friend allows you to email a link to the article to one or more others. You can include your own message with the email.
If you have author or editor access you may also update the article, or see all other articles in that category.
-
The article block displays additional information about the article. The block shows who wrote the article, the date it was written, who last updated it and when and whether or not the article is public or private. There are more options at the bottom of the screen. You can rate the article here. When you add a rating, a comment box opens allowing you to say why you rated this article the way you did.
- Other users' comments are displayed at the bottom of the screen. The full comment may be displayed, or just a link to it.