To add a file from your local computer to the server, select Files from the menu bar to display a series of sub-tabs. To link to a file that is already on your server, see Add a local file.
- To upload a new file that requires no further approvals before becoming available, select the Files tab. Then click the Add new button to display the form where you specify the file.
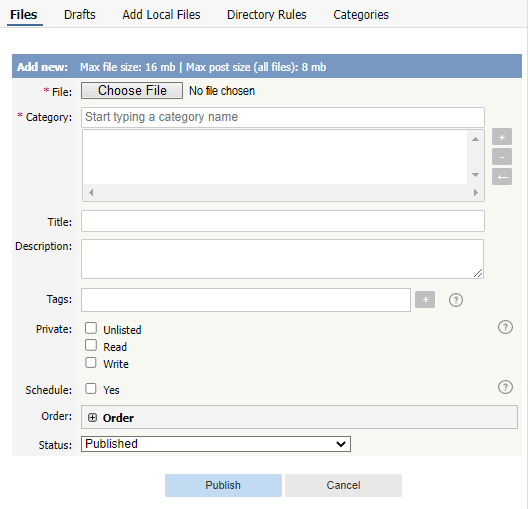
Complete the form's fields:
- File — Select the file to upload.
- Category — Add one or more categories for the files by clicking the + icon to the right of the Category field and selecting from the list of categories provided.
- Title — Add a title.
- Description — Add a description.
- Tags — You can add one or more tags to help users find the file. Click the Tags link and then select tags:
- Type a few characters of the tag you want in the field that appears, and select the tag from the options provided.
- Click the "Choose from your tags" link to display all the tags available. Select the ones you want to associate with this file.
- Private — You can opt to restrict either or both read and write access to the files. If you check either check box another field appears where you can specify which roles users must have to be able to read and/or update the file. You can also make the file unlisted and users can access it only if they have a link to the file.
- Schedule — Check the Yes check box and use the fields that appear to set a date when the status of the current files changes from unpublished to published. Check the And check box to set a date after which the status of the current files changes from published to unpublished.
- Order — The categories you have selected for the file are listed in the Order field, along with a drop-down list of where to place the article within the category. There is one order list for each category you have chosen.
- Status — You can set the file status as Published or Unpublished.
Click Save to upload the file.
Click Cancel to abandon your edits and close the form.
If the Published status is selected, the Publish button appears instead of Save. After clicking the Publish button, the file becomes visible in the Public area.
The maximum size of a file you can upload depends on PHP settings. The default is 2MB.
See here for Files settings (Allowed extension, Max file size, etc).
