The export to PDF or HTML screen allows you to export your knowledgebase articles to HTML pages or PDF files.
The Summary screen
When you first enter the screen you see a summary of any current exports that have been set up.
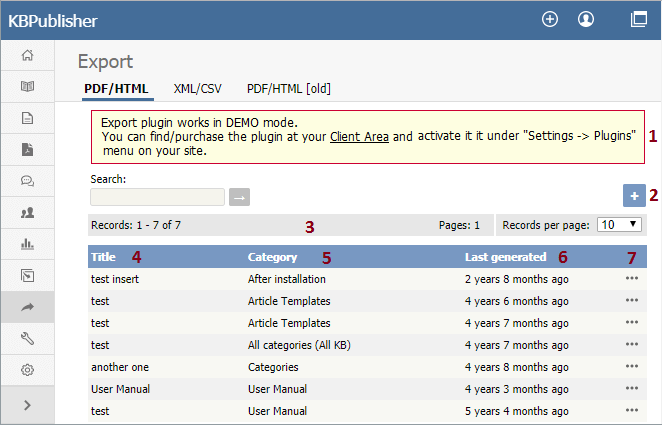
- Export functionality is provided as a plug-in and is purchased separately. If you have not purchased the plug-in you will get a message telling you that the plug-in works in demo mode – with some restrictions – but otherwise doesn't work.
- Add New allows you to set up a new export.
- The records information line contains the usual information, like how many records there are, and how many pages of records there are.
- Title is the name of the export.
- Category is the top-level category that will be exported. Any sub-categories will be exported as well.
- Last generated shows the last time you generated documentation to export.
- The options button opens a menu with the commands:
- The Details/Download action allows you to view details of the specific export and download the file.
- The Update action allows you to update the export.
- The Delete action allows you to delete the specific export.
When you click on Add New, you are taken to the Add New Export screen.
The Add New Export screen
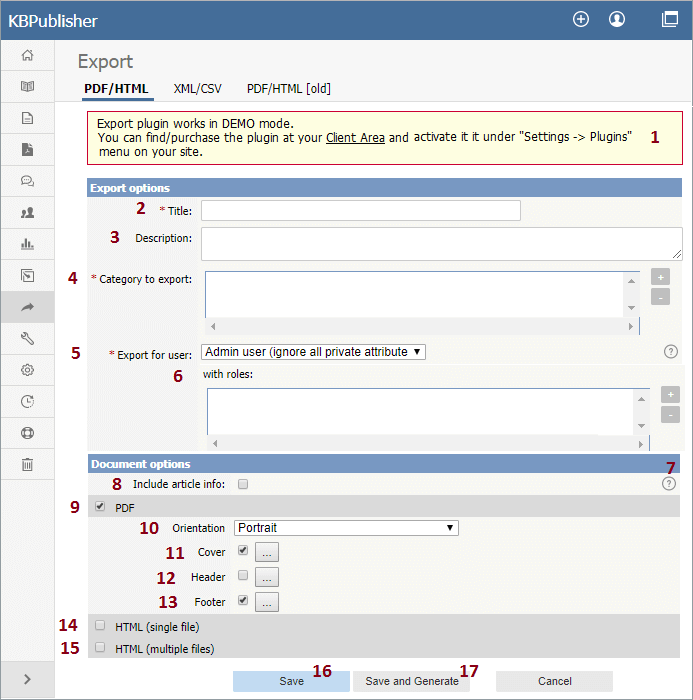
- Again, if you have not purchased the plug-in, you will get the message at the top of the screen.
Export options
The export options define what data you are actually going to export.
- Title is the name you are giving to this particular export.
- The description is displayed on the Export Details screen. Use it for information about how and why this particular document template was set up.
- Category to export. You can only export one category at a time but, but all sub-categories are exported as well.
Click on the + to the right of the Category to export field to select the category. - Export for user controls which articles are exported. That is, the audience for the published document.
To export all articles in the category and in any sub-categories, irrespective of roles or privileges, choose Admin user. You might use this for internal documents, or even for proofing.
To export only those articles that the user sees in the Public view, without logging on, select Not logged user.
To export articles that a user in a specified role will see, select Logged in user. If you select this option, you also need to assign a role.
- The with role field is only displayed if you choose to export for a logged user. Click on the + to the right of the with role box to select the role. Again, you can only select one role.
- If you need help filling out a specific field, click on the ? for that field.
Document options
The rest of the screen is devoted to how the output is produced.
- Select the Include article info checkbox if you want article information to be included into the export file (article ID, last update, etc).
- When you check the PDF button extra fields are displayed for you to complete. These fields are specific to the PDF output.
- Orientation allows you to set the page as portrait or landscape.
- Cover allows you to set the front page of your PDF document.
- Header allows you to set the header which appears on the top of each page of your PDF document.
- Footer allows you to set the footer which appears at the bottom of each page of your PDF document.
- If you choose HTML (single file) your document is produced as one big HTML file.
- If you choose HTML (multiple files) each article gets its own HTML file.
- Click Save to save the template without generating the document.
- Click Save and Generate to create documents as well as saving the template.
To actually view the generated document you need to go back to the Export screen and click on the template you have saved.