You can import users in bulk. You might want to do this if you are changing over to KBPublisher from an old system, or if you have signed up a new company or organization and the company provides you with a list of users to create.
The process is:
- Create a file of users to import
- Upload a test sample to the system
- Import.
Create a file of users to import
First, you need to create your file of users. This is a comma-separated (CSV) text file that consists of some or all of: first name, last name, email, username, user ID, date registered, middle name, telephone number and an active flag.
- The first five fields (highlighted bold) must be included. You can include some, all or none of the others as required.
- They do not have to be in the same order as above, but each line in the import file must contain the same fields in the same order.
- The password is encrypted. You cannot import plain text passwords; they must be encrypted in MD5 format. Ensure that the person providing you with the list encrypts the passwords.
- The active flag defaults to '1', which is active, so the only time you would set this is if you don't want the users to be active.
- Place the data for each user onto a single line, and separate each field by a comma. Do not include spaces before or after the comma.
- The TestImportUsers.csv file is a sample that shows what your upload file should look like. This file includes the four default fields only.
- Field sizes and types are specific, as per the table below. Your data must fit within these parameters or the upload will fail.
| Field |
Type/size |
M/O |
Comments |
| first_name |
varchar(50) |
compulsory |
|
| last_name |
varchar(100) |
compulsory |
|
| email |
varchar(100) |
compulsory |
|
| username |
varchar(50) |
compulsory |
|
| date_registered |
date |
optional |
Format YYYY-MM-DD.
If not supplied will use current date.
|
| middle_name |
varchar(50) |
optional |
|
| phone |
varchar(20) |
optional |
|
| active |
tinyint(1) |
optional |
Default = 1 |
Create a test file
Don't try to upload the whole file without testing it first. If something goes wrong you may then have to delete all those half-imported users and try again. Create a test file and run that first.
- Copy the first, say, three lines of your text import to a separate file
- Either:
- Save the file to a local drive (e.g. somewhere on your c: drive)
- Upload the file to the server
Import the test file
You are now ready to import the test file to KBPublisher.
- Click on the Import/Export menu
- This brings up the Import Users tab
- If the import file is on your c: drive (or another local drive),
- Choose Load Data Local File in the SQL Load Command field
- Browse for the CSV file on your drive and open it
- If the import file is on the server,
- Choose Load data file
- Type the address where the file is located into the Path to file field on CSV file line
- Move the CSV fields around to specify which fields are in the file and what order they are in.
Do this by clicking on the name of the field you want to move and dragging and dropping it into the appropriate place.
For example, suppose you only want the five mandatory fields included. You need to move the date_registered and imported_user_id fields out of the Fields in CSV box and into the Available table fields box. Let's start with the date_registered field.
- Click on the date_registered field and hold the mouse down
- While holding the mouse down, drag the date_registered field over to the Available table fields box
- Drop the field into the box by releasing the mouse
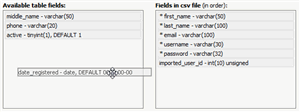
Make sure that you place it in the order it appears in the file.
- Change CSV options if required.
- Click Load.
Once the load is complete you are returned to the Import Users tab. At the top of the screen you see a message telling you whether the import was successful and how many users were imported.
- If the import reports as successful, click on the Users tab to check the result for yourself.
Fix any problems
All going well, you should now have three new users. Check them carefully and ensure that everything worked as you expected.
If you had problems, delete these three users, fix the test file and run it again. Keep fine-tuning until it works, and then update the real file to match the fixes you made in the test file.
You are now ready to import the rest of the users.
Import users
Import the rest of the users using the same process as for the test file, only this time using the real data file.
Note:
- Imported users have no roles or privileges.
- If any unique keys will be duplicated during import, records from cvs file will be ignored.
- Use the bulk actions option in Users module to change roles, privileges, etc.

