When you want to add files to the knowledgebase, you can upload files from your local computer, or you can link to files that are already on your server or files located on Amazon S3 server. In KBPublisher such files are known as "local files". If the file already exists on the server it saves space to reference it rather than uploading a second copy specifically for the knowledgebase.
By adding a reference to a file that may be also be available through your corporate website or some other site (forms, disclaimers, fair-use and privacy policies, product disclosure statements, catalogues, printable manuals, and so on) you can make the knowledgebase richer and more useful without taking up additional space.
To add a local file (a reference to a file already on your server):
- Select the Files menu.
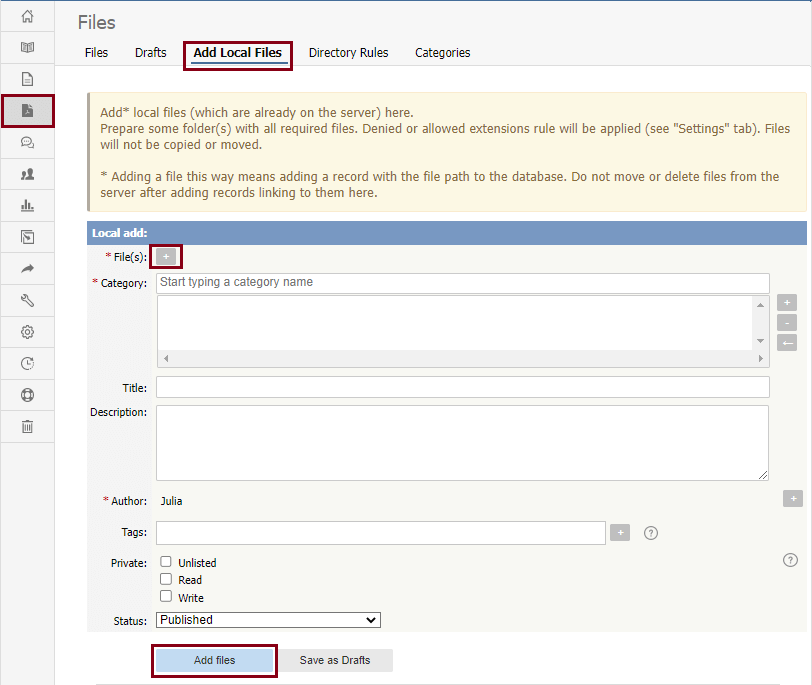
- Choose the Add Local Files tab to display the Local add form:

Complete the form's fields:
- Files — Click the [+] icon. In the popup window, choose the source directory or Amazon S3 (if enabled; see the "Allow access to Amazon S3" setting in the Admin tab to enable the Amazon S3 option).
- For Directory, enter the name of the directory on your server which holds the files you want to link to.
- For Amazon S3, enter the S3 path in format: bucket_name/prefix/... (prefix is optional)
Then click the [ >> ] icon to display files. Check all files or check the checkbox for each file you want to link to, and click Done.
- Category — Add one or more categories for the files by clicking the [+] icon to the right of the Category field and selecting from the list of categories provided.
- Title — Add a title. If you are linking to more than one file in this operation, all files will have the same title.
- Description — Add a description. If you are linking to more than one file in this operation, all files will have the same description.
- Author — By default, you are identified as the author of the files. Click the Delete link to the right of your name to remove it.
- Tags — To add a tag, click [+]. You can add tags one at a time by hitting Enter after typing each tag. Or you can add multiple tags at a time by separating each with a space as you type. You can join 2 or more words together in one tag by enclosing them in quotation marks.
To select a tag from your existing list (tags previously used in KBPublisher), click Choose from your tags and select the tags you want to use.
- Private — You can opt to restrict either or both read and write access to the files. If you check either check box, another field appears where you can specify which roles users must have to be able to read and/or update the file. If you select the Unlisted check box, the file will become available only for users who has a link to the file.
- Status — You can set the file status as Published or Not published.
When the form is complete, click Add files to add the files to the list on the Files tab.
If you have the correct permissions, you can add the files as drafts. Click Save as Drafts to add the files to the list on the Drafts tab. Use this option for files that you do not want to publish yet, or for files that require further review or approval before becoming available.
Tips:
- The files that are found are controlled by the Allowed/Denied extensions setting on Admin tab under Settings. If you have said there are no restrictions, then all files in the directory are found. If you have said only image and text files are loadable, then only image and text files will be found.
- The PHP open_basedir setting determines where KBPublisher searches for the files. If you find that Get Files only searches the directories under the knowledgebase itself, then check your settings to see if PHP restricts it to this.

