This screen allows you to create custom fields, and to place them in your knowledgebase.
The Custom Fields tab
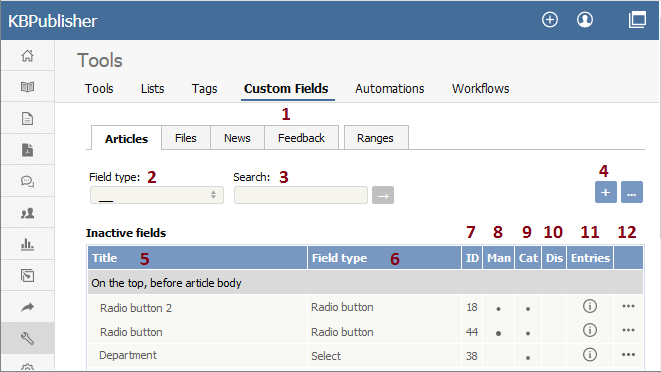
- The Custom Fields tab allows you create and manage the fields and to control which categories or areas they are attached to. The Ranges tab allows you to create a set of valid values which you can then assign to one or more custom fields.
- Field type is a filter that allows you to view custom fields for a specified Field types. Select your filter and then click the [→] button to restrict the list.
- You can also search on the name of the custom field by typing the name into the Search fields and then clicking the [→] button.
- Clicking the Add New button allows you to create a new custom field. Note that you can only create the field to go with a specific entry type. Thus if you want to add, say, a Department field to both articles and files, then you would need to create two custom fields.
- The Title is the name that the user sees on the screen when they add or read an article
- The Field type denotes the type of field it is. Whether it's a checkbox, or a select box, or even free-flowing text
- The ID denotes a unique identifier of the custom field.
- Man denotes mandatory. When a field is mandatory the author creating the item cannot leave this field blank.
- Cat shows if the custom field is displayed in a certain category.
- Dis shows if the custom field is displayed in the search screen.
- The [i] button opens a list of entries where the custom field is used.
- The last column contains the [...] button which opens a menu with the following commands:
- Apply allows you to set a value for all articles which match field criteria. This is useful when you already have existing items and want to add a value to the old items. Note that it only applies value to items that do not already have an associated custom value, so you don't have to worry about overwriting items you have already set.
- Set active/inactive allows you to set the status of the custom filed. If the active status is set, the user can fill it in.
- Edit allows you to edit the custom field. Note that you can also double-click anywhere in the line on the field to edit as well.
- Delete allows you to delete the field. If you attempt to delete a field that is being used you will get a warning message telling you the field is being used and you will need to decide if you still wish to delete the field after that.
The Ranges tab
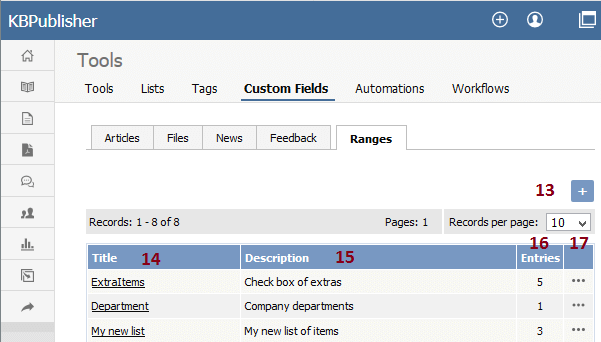
The ranges are the valid values you can select from. For example, you may have a list of departments, or a checkbox that allows you to denote whether extra information is required.
You can also re-use ranges. That list of departments might be a drop-down select box in your FAQ category, and a radio-button select on the feedback form.
- Add New here means add a new set of valid values.
- Click on the Title to open the range set and add new values or edit existing ones, including re-order the fields.
- Description is a description of the field range. When a user is adding a custom field, this is the text they see when they click on the inline help.
- Entries shows a total number of custom fields where the range is used.
- The last column contains the [...] button which opens a menu with the following commands:
- View Items takes you to the range, so that you can edit, update or re-sort the individual valid values
- Edit allows you to rename the range and update the description
- Delete deletes the range. If the range is being used by custom fields, you will not be able to delete it. Use Entries to see which fields contain the range.
Bulk actions available depend on your user access.
For example if your privilege does not allow you to delete items, or allows you to only delete articles that you have created, then there is no 'Delete' action in the list of options. If your privilege does not allow you to update items, or allows you to only update items you have created, then this menu will not be available for you at all.

